Trying numl on OSX with F# and Xamarin

Today, at devLink 2014, my last session of the day is “Practical Machine Learning – Predicting Things” by Seth Juarez. In his presentation, Seth talks about machine learning and his machine learning library, numl. The session is very entertaining and I learn a lot from it.

Fun fact: Seth originally called his library, Machine Learning Library for .NET. But when he met Phil Haack at Mix 2011, Phil recommended him to find a shorter name. So Seth just changed his library name to numl to make it sounded like nuGet. 🙂

I have played with numl earlier this year by writing short F# script. After the session today, I just want to look at it again and see if my short F# script could still be run on OSX with Xamarin/Mono.

Here are some quick instructions:

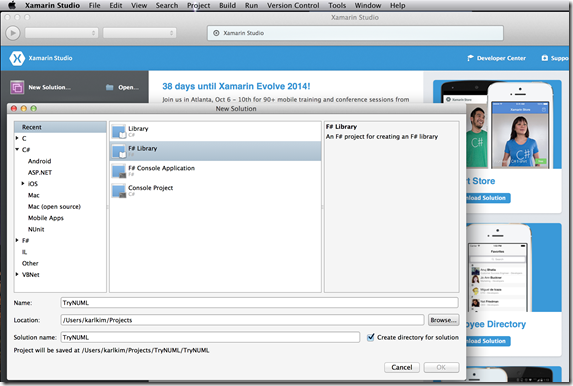
1. Open Xamarin Studio and create a F# Library project.

Screen Shot 2014-08-28 at 10.37.51 PM

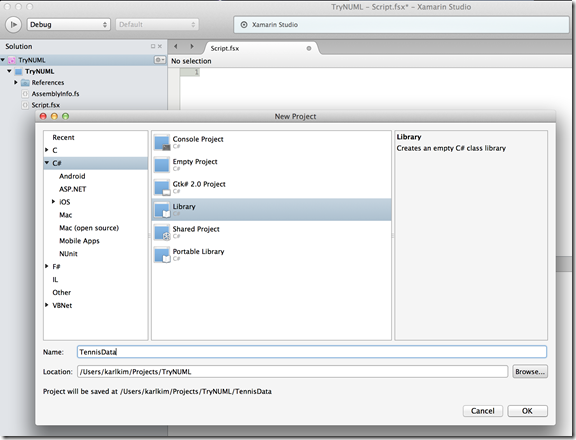
2. Create C# Library project and add numl NuGet package to C# library.

Screen Shot 2014-08-28 at 10.39.35 PM

Screen Shot 2014-08-28 at 10.43.00 PM

Screen Shot 2014-08-28 at 10.43.46 PM

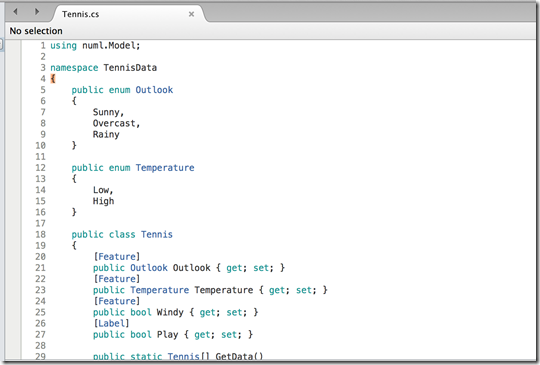
3. Add Tennis class and data set from here or here.

Screen Shot 2014-08-28 at 10.44.25 PM

4. In F# Library project, I copy my existing F# code, adjust reference locations a little bit, and run it. Everything seems to work flawlessly!

Screen Shot 2014-08-29 at 2.49.52 PM

That’s it. It’s good to learn that my existing F# code can run smoothly on OSX. Hopefully, I’ll have sometime playing with numl more when I am back to Nashville.

Good night from Chattanooga!

Make IIS Express works with http://127.0.0.1

I never notice that IIS Express doesn’t listen to web requests other than localhost. So, to my surprise, when I try http://127.0.0.1, I got HTTP 400, Bad Request instead.


127.0.0.1-Error


Change 127.0.0.1 to localhost and everything is fine.

localhost


Anyway, you can set your IIS Express to let it listen to a request for 127.0.0.1 easily.

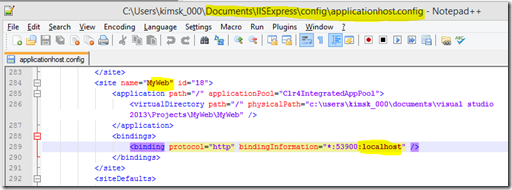
1. Look for a file applicationhost.config. It’d be under /documents/IISExpress/config.

2. Go to <sites> section and look for your site. In this example, I have my web project named MyWeb.

iis-express-setting-before

3. Change localhost to 127.0.0.1

iis-express-setting-after

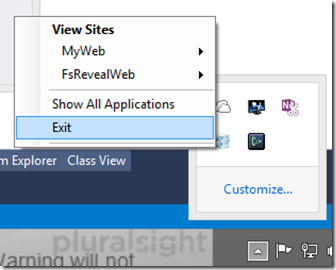
4. Stop IIS Express and run your web site again.

exit-iis-express


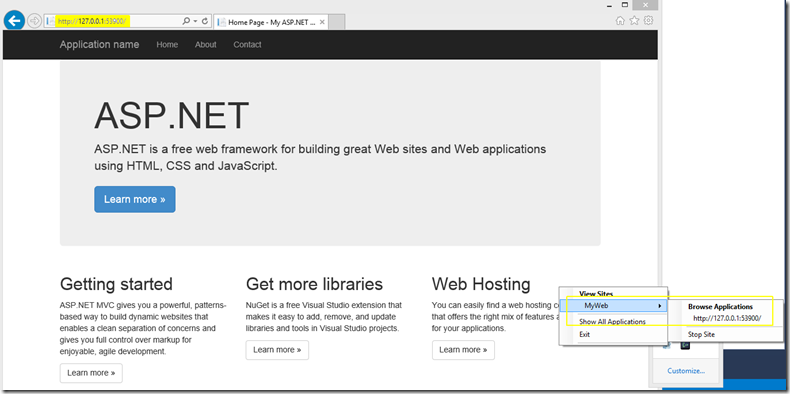
Now you should be able to access your web site thru 127.0.0.1 address now!

127.0.0.1-work


Hope this helps! 🙂

Could not run the “GenerateResource” task because MSBuild could not create or connect to a task host with runtime “CLR2” and architecture “x86”.

Since I have experienced the same error more than three times while creating Windows Service (.NET 3.5) on Visual Studio 2012 and/or 2013, I think I should post a solution here for my quick reference. If you create a Windows Service and target .NET 3.5 on Visual Studio 2012 or 2013, you might experience the error message while compiling the project.

Here is the full error message:

Could not run the “GenerateResource” task because MSBuild could not create or connect to a task host with runtime “CLR2” and architecture “x86”. Please ensure that (1) the requested runtime and/or architecture are available on the machine, and (2) that the required executable “C:\Program Files (x86)\MSBuild\12.0\bin\MSBuildTaskHost.exe” exists and can be run.

To resolve it, go to your csproj file and add the following line under the default property group:

<PropertyGroup>

      <DisableOutOfProcTaskHost>true</DisableOutOfProcTaskHost>
</PropertyGroup>

And that should resolve the issue, everything should be compiled.


IE8 Object doesn’t support property or method ‘map’

One function that I used very frequently in Functional Programming language like F# is map. For C# I can use Select function in LINQ to do the same thing. With ECMAScript5, JavaScript also comes with built-in map function.

Here are how map functions looks like in JavaScript:

var sqrt = function(x){ return x*x;};
var numbers = [1,2,3];
var squares = numbers.map(sqrt);
// squares is [1,4,9]

However, if you still have to support IE8, unfortunately, it doesn’t support map function.

To make IE8 supports the map function, you can add a Polyfill that you can find on this page. Or if you use either jQuery or Lo-Dash, you can use jQuery.map or _.map as well.

// jQuery
var squares = jQuery.map(numbers, sqrt);

// Lo-Dash
var squares = _.map(numbers, sqrt);

Using F# and R Provider with Kaggle’s Facial Keypoints Detection

Lately, I have been trying to learn more about Data Science and Machine Learning. Following a coursera’s machine learning class and reading some books like, Data Science for Business and Mining the Social Web is very useful. However, you may want to get your hands dirty and learn the topics by solving the real-world problems. Fortunately, there is a site called Kaggle which provides data and problems for you to solve.

Basically, Kaggle is a platform allowing companies and researchers to post their data, so that people like data scientist, statisticians, data miners, and so on can compete to produce the best predictive models. Most competitions are real-world problems that big companies are trying to solve, and if you come up with the best model, you could win some prizes or even get a job!  For a newbie like me, Kaggle also has 101-type competitions that could help you learn the basic while having fun solving the real-world problem. One of the problem that I am looking at is Facial Keypoints Detection which should also help me learn computer vision in addition to data science and machine learning.

Many languages and environments like R, MATLAB, Octave, and Python are generally used in Data Science and Machine Learning fields. However, F# is also a great language for data-oriented problem-solving, data science, and machine learning tasks as well. REPL and succinctness of F# allows you to explore and manipulate the data in both functional and imperative styles. With type providers, acquiring data from various sources like CSV, XML, JSON, and databases as well as interoperability with R can be done within F#. In addition, there are libraries like Deedle and FSharp.Charting that will be very useful. And as F# is a .NET languages, you can use .NET libraries like Math.NET and numl to help as well.

To get start quickly, we can just install the FsLab NuGet package that put together useful F# libraries for Data Science task.

image

NOTE: As of 4/26/2014, FsLab is still beta, so you have to select “Include Prerelease” option.

This post, I will show how we can use F# and R Provider with the Facial Keypoints Detection. I won’t try to solve the problem yet :-), but I will follow the R tutorial that let me learn R as well as getting familiar with the data.

The first step is to download the training data from here. The training file is in csv format with 7049 rows and has 31 columns, 30 of those columns keep 15 (x,y) keypoints such as nose tip, left eye, etc. The last column is a list of pixels representing a 96×96 image.

I want to use my own type, so I just create a Face type and write a simple parser in F#.

type Face =
    {
        LeftEyeCenter:Option<decimal*decimal>
        RightEyeCenter:Option<decimal*decimal>
        LeftEyeInnerCorner:Option<decimal*decimal>
        LeftEyeOuterCorner:Option<decimal*decimal>
        RightEyeInnerCorner:Option<decimal*decimal>
        RightEyeOuterCorner:Option<decimal*decimal>
        LeftEyeBrowInnerEnd:Option<decimal*decimal>
        LeftEyeBrowOuterEnd:Option<decimal*decimal>
        RightEyeBrowInnerEnd:Option<decimal*decimal>
        RighttEyeBrowOuterEnd:Option<decimal*decimal>
        NoseTip:Option<decimal*decimal>
        MouthLeftCorner:Option<decimal*decimal>
        MouthRightCorner:Option<decimal*decimal>
        MouthCenterTopLip:Option<decimal*decimal>
        MouthCenterBottomLip:Option<decimal*decimal>
        Image:int[]
    }

let lines = File.ReadAllLines("D:/kaggle/facial-keypoints-detection/training.csv")

let faces =      
    let d = Decimal.TryParse
    let toXy v1 v2 =         
        match d v1 with
        | false, _ -> None
        | true, x ->
            match d v2 with
            | false, _ -> None
            | true,y -> Some(x,y)        

    lines
    |> Seq.skip 1
    |> Seq.map (fun (row:string) -> 
            let r = row.Split(',')
            {
               LeftEyeCenter = toXy r.[0] r.[1]
               RightEyeCenter = toXy r.[2] r.[3]
               LeftEyeInnerCorner = toXy r.[4] r.[5]
               LeftEyeOuterCorner = toXy r.[6] r.[7]
               RightEyeInnerCorner = toXy r.[8] r.[9]
               RightEyeOuterCorner = toXy r.[10] r.[11]
               LeftEyeBrowInnerEnd = toXy r.[12] r.[13]
               LeftEyeBrowOuterEnd = toXy r.[14] r.[15]
               RightEyeBrowInnerEnd = toXy r.[16] r.[17]
               RighttEyeBrowOuterEnd = toXy r.[18] r.[19]
               NoseTip = toXy r.[20] r.[21]
               MouthLeftCorner = toXy r.[22] r.[23]
               MouthRightCorner = toXy r.[24] r.[25]
               MouthCenterTopLip = toXy r.[26] r.[27]
               MouthCenterBottomLip = toXy r.[28] r.[29]
               Image = (r.[30].Split(' ') |> Array.map (Int32.Parse))
            }
        )

If you want you can use CSV Type Provider, but you should specify the InferRows to be zero to check the whole file and set PreferOptionals to be true to use Options type.

type FaceCsv = CsvProvider<"D:/kaggle/facial-keypoints-detection/training.csv", InferRows=0, PreferOptionals = true>
let faces = new FaceCsv()

After we get all training data, the first thing is to visualize the face data. R already has nice graphics library that we can use to display the image, so we can use R Provider to call those functions from F#.

Let’s get values from the first face data.

// R Stuff
open RProvider
open RProvider.``base``
open RProvider.graphics
open RProvider.grDevices

// helper functions
let o x = x :> obj
let imXy p = match p with Some(x,y) -> (96m-x),(96m-y) | _ -> (0m,0m)     
let face i = faces |> Seq.nth i
let imPointParams (x,y) color = ["x",o x;"y",o y;"col",o color] |> namedParams

// get values from face
let im = R.matrix(nrow=96,ncol=96,data=Array.rev((face 0).Image))
let noseTipXy = imXy (face 0).NoseTip
let leftEyeCenterXy = imXy (face 0).LeftEyeCenter
let rightEyeCenterXy = imXy (face 0).RightEyeCenter

NOTE: To use R.NET and R Provider, you still have to download and install R,

Now we have all values, we can put them in a format that R expects and call the R functions.

// Visualize image using R
// image(1:96, 1:96, im, col=gray((0:255)/255))
let imageParams = 
    [
        "x",R.c([|1..96|])
        "y",R.c([|1..96|])
        "z",im
        "col",R.gray(["level",R.c(seq { for i in 0. .. 255. -> i/255.})]|>namedParams)
    ] |> namedParams
R.image(imageParams)

// add points for nose tip, left eye, right eye
// points(96-d.train$nose_tip_x[1], 96-d.train$nose_tip_y[1], col="red")
R.points(imPointParams noseTipXy "red")
R.points(imPointParams leftEyeCenterXy "blue")
R.points(imPointParams rightEyeCenterXy "green")

And you should see the sample image.

image

Although, you should be able to call R functions directly from F#, sometimes trying to figure out R format can be cumbersome. What we can do is to use REngine.Evaluate like this as well.

im.Engine.SetSymbol("im", im)
im.Engine.Evaluate("image(1:96, 1:96, im, col=gray((0:255)/255))")

Now since I know how to use R to display gray-scale image, I can use the same trick to display the image for Digit-Recognizer data :-).

image

You should see the power of F# which allows us to process and manipulate data with F# and utilize R for statistical computing and graphics!

In the future post, I plan to share more about my journey with Data Science and Machine Learning in F#. Happy data mining!

Using F# fold function to implement recursion

In the last post, we talked about techniques to implement tail-recursion in F#. We also learned that to write pure functional code we can only use immutable data structures which means we have to implement loop using recursion.

Writing recursive function can be cumbersome (e.g., the function has to have one or more base cases) and hard to understand. It’s also harder to make sure that your recursive function is a tail-recursive one.

Fortunately, using higher-order function and data structure like list (which is a recursive data structure) can help easing the pain.

Let’s look at our non-tail-recursive factorial function from last post again.

let rec factorial x =
    if x <= 1 then
        1
    else 
        x * factorial (x - 1)

Since the function basically multiplies numbers (e.g., x, x-1, x-2, …) together, we can actually think of the input as a list of numbers like [5,4,3,2,1] instead.

With that in mind, we can now implement factorial function using List functions like List.fold.

Here is the List.fold signature:

(‘State -> ‘T -> ‘State) -> ‘State -> ‘T list –> ‘State

List.fold is a higher-order function that takes the following parameters:

(‘State –> ‘T –> ‘State)

A function that takes ‘State which we can think of it as an accumulator, ‘T which in this case is each value in the list, and returns new accumulator.

‘State

An initial state of an accumulator.

‘T list

The input list

The last ‘State is the final out put that we want.

Now, let’s see how we can implement our factorial function with only one line of code :-).

let foldFactorial x = [1..x] |> List.fold (fun acc i -> acc * i) 1

The most important part is the lambda expression, (fun acc i -> acc * i), that we pass to the fold function. The acc parameter in the lambda expression is the accumulated result like the acc parameter in accTailRecursiveFactorial recursive function from the last post.

let accFactorial x =
    let rec accTailRecursiveFactorial x acc =
        if x <= 1 then 
            acc
        else 
            accTailRecursiveFactorial (x - 1) (acc * x)

    accTailRecursiveFactorial x 1

Using fold also gives us tail recursive function. Here is the IL generated by foldFactorial function.

image

(NOTE: some lines have been cut to make the screenshot fit the page)

If you are curious, below is what List.fold looks like (NOTE: The code below is from list.fs in F# compiler and code library on GitHub). You probably notice that it has the nested recursive function that is tail-recursive!

[<CompiledName("Fold")>]
let fold<'T,'State> f (s:'State) (list: 'T list) = 
	match list with 
    | [] -> s
    | _ -> 
		let f = OptimizedClosures.FSharpFunc<_,_,_>.Adapt(f)
        let rec loop s xs = 
			match xs with 
            | [] -> s
            | h::t -> loop (f.Invoke(s,h)) t
		loop s list

And as a bonus, you can even make the factorial code shorter by using operator (*) which is actually a normal function in F#.

let foldFactorial2 x =  [1..x] |> List.fold (*) 1

Better yet, the code can be made shorter by using List.reduce which is a specialized version of fold that treat the first input on the list as accumulator.

let reduceFactorial x = [1..x] |> List.reduce (*)

This post shows how tail-recursive code could be implemented using List.fold and List.reduce. Since implementing recursive algorithm is important in functional programming, using built-in F# function like fold and reduce really reduces (no pun-intended 🙂 ) our work.

Recursion and Tail-recursion in F#

While imperative programming language paradigm depends on updating mutable variables (or introducing side effect) to change state of the program, pure functional programming only uses immutable data structures to represent their state. Side effect is required if you need your program to do any work (i.e., I/O), but undesirable side-effects are the root of many bugs. Immutability makes you write safer code as the code is more predictable.

When people (most of us!) with imperative programming languages background start looking at functional programming, we probably think that if we aren’t allowed to change anything, how we can even do anything useful at all. The answer is that instead of writing program as a sequence of statements that change the state like we do in imperative style programming, we write functional programs differently.

Today, we are going to look at recursion which is a technique that allows functional programs to implement loop-like algorithm without using mutable variables. Basically, a recursive function is a function that calls itself.

Let’s see implementations of factorial function using loop and recursion in C#:

// using recursion
int Factorial(int n)
{
    return n<=1?1:n*Factorial(n - 1);
}

// using loop
int FactorialLoop(int n)
{
    var ret = 1;
    while (n >= 1)
    {
        ret *= n--;
    }

    return ret;
}

Now let’s see our F# implemetations:

let rec factorial x =
    if x <= 1 then
        1
    else 
        x * factorial (x - 1)

let factorialLoop x = 
    let mutable n = x
    let mutable ret = 1
    while n >= 1 do
        ret <- ret * n
        n <- (n - 1)
    ret

In C#, the recursive and non-recursive function signature are the same. However, in F#, the rec keyword is needed by the F# type inference system. (I show F# implementation in loop just to show that we can also write F# code in imperative style by using mutable keyword as well although it’s not preferable.)

NOTE: Writing the recursive functions like this every time we need loop-like algorithm can be cumbersome, so most functional languages provide an easier way for doing recursion with higher-order function technique (i.e., Map or Reduce functions). I will write about it in the later post.

Stack Overflow

Ok. Now we can use recursion to implement loop-like algorithm even we aren’t allowed to use mutable variable. However, there is one problem. As you might already know, internally, when a function is called, the caller state will be put into the stack. So if we have a recursive function that call itself deeper and deeper, the program might experience Stack overflow.

Let’s set a break point at the base case and look at our call stack when we call F# factorial 10:
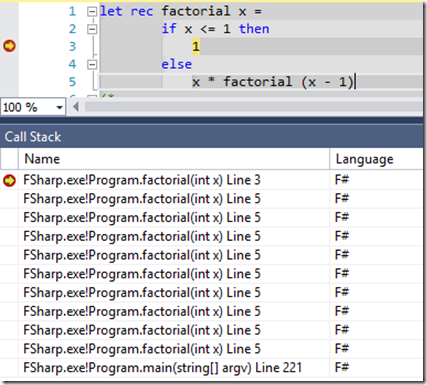
CallStackFactorial10

Although we should not have any stack overflow issue here, stack is not infinite resource, the naive recursive function can cause stack overflow with large number of iterations eventually.

Intermediate Language

Before we talk about tail recursion, let’s talk about IL or Intermediate Language.

What is IL or Intermediate Language? When you compile CLI languages like C#, VB, or F#, the .NET compiler generates IL. You can think about it as the native or assembly language of .NET which runs on CLR. When the .NET application is run, each IL method is translated into native machine code Just-In-Time before it’s first executed.

Although it looks just like normal assembly language, IL is a stack-based language and has no concept of registers. As we walk through each samples, we will talk about some of those instructions and learn what it does.

Tail Recursion

Now we understand recursion, stack overflow, and IL, let me introduce tail call and tail recursion. Tail recursion is a special form of recursion, where the compiler can optimize the recursive call in tail position to not allocate stack space to keep caller state. The idea is that if a compiler can guarantee that the call to the recursive function is the tail call or last action that happens before the function returns, there is no need to keep the caller state in the stack at all!

F# is a functional-first language and its compiler is designed to provide tail-call optimization if possible. The most efficient way is to turn the recursive function into a function with a loop. If the compiler can’t do that because the recursive function is more complex, then the compiler generate call IL with a tail. prefix to let the JIT compiler uses the tail call.

Let’s look at the recursive version of the factorial function in F# again:

let rec factorial x =
    if x <= 1 then
        1
    else 
        x * factorial (x - 1)

At the first glance, we might think that factorial (x-1) is the last action of the function. However, the last action is actually a multiply operation. If you don’t believe me, you can just look at the IL generated from this function.
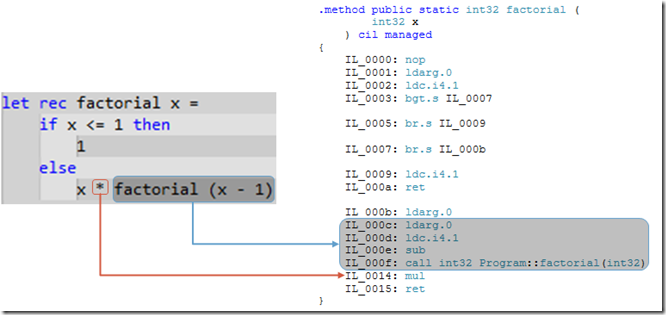
image

Don’t worry if you don’t understand most of the IL, what I want you to see is mul, which is a multiply operation, is executed before ret, which return from the function, and after call that is the IL that call the function. In this case, it calls its own function recursively.

If F# code above is not tail-recursive function, then how we can create tail-recursive function. In functional programming we have patterns that we can use to make sure that our recursive function is tail-recursive.

Accumulator Pattern

The first pattern is called Accumulator Pattern. In this pattern, we introduce another parameter, accumulator, that keeps the current state of the recursion, so that information doesn’t need to be kept in the call stack and used later. Let’s see how we can apply the pattern to our factorial function above.

let accFactorial x =
    let rec accTailRecursiveFactorial x acc =
        if x <= 1 then 
            acc
        else 
            accTailRecursiveFactorial (x - 1) (acc * x)

    accTailRecursiveFactorial x 1

So we basically create a non-recursive function that will get called by the consumer. The non-recursive function has the nested recursive function that accepts two parameters, one is the same recursive parameter, and another one, acc, is a parameter that accumulates multiplied result together. Let’s see the call stack when we execute accFactorial 10.

image

As you can see, our call stack is pretty clean now!

When F# compiler sees that the last action is a call to a recursive function, it knows that it can generates IL with tail. prefix. When JIT sees the tail. prefix, it knows that it must use a tail call.

image

(NOTE: some lines have been cut to make the screenshot fit the page)

Continuations

In this pattern (aka continuation passing style), we will see the power of F# and functional programming language! When we treat a function as a value, we can pass it around, make a copy, or create a new one on the fly. So instead of pass another parameter with the accumulated value like in Accumulator Pattern case, why don’t we just build expressions on the fly and pass them via function instead!

Let’s implement the same factorial function with this pattern:

let contFactorial x =
    let rec contTailRecursiveFactorial x f =
        if x <= 1 then 
            f()
        else 
            contTailRecursiveFactorial (x - 1) (fun () -> x * f())

    contTailRecursiveFactorial x (fun () -> 1)

The implementation looks just like the Accumulator Pattern. In this pattern, we also have an outer function which is non-recursive and the nested recursive function. However, instead of passing an accumulator, we pass a function!

Let’s see the call stack and we should see the clean call stack:
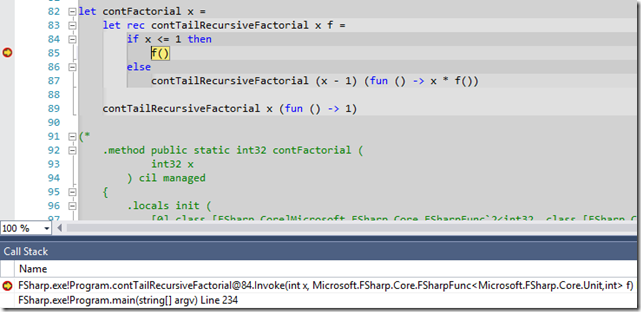
image

Now let’s see the generated IL and we should see tail. prefix again:

image

The advantage of using Continuations is that you are not limited to passing a single computed value which might not be possible to do in more complicated recursive function which I can post about it later.

Happy Coding!
Learning F# with F# Succinctly by Robert Pickering

Learn at least one new language every year.

Above is one of the best recommendations in my developer career. It is from the book, “The Pragmatic Programmer” by Andrew Hunt and David Thomas. The obvious advantage of learning a new language is to expand your problem solving skills as different programming languages usually have different styles and approaches to solve problems. To get the most benefit, I think we should not learn the new language that is too similar to the languages we already know (e.g., C# programmer learning Java).

Last summer I was having fun with the “Coding Dojo: a gentle introduction to Machine Learning with F#” by Mathias Brandewinder, so I decided to learn more about F#.

WinRT-DigitRecognizer.PNG (954×588)

I also chose F# for the following reasons:

  1. F# is a “Functional-First” programming language unlike C# which is “Object-Oriented” first. You probably heard a lot of buzz around functional programming paradigm and why it matters especially since the free lunch is over.
  2. F# is one of .NET CLR languages, so interoperability with C# is easy. I can still use C# for many tasks that it is good at such as GUI programming (i.e., XAML for WinRT, Silverlight and WPF) while utilizing F# for other tasks that functional programming will shine.
  3. I can use my favorite IDE, Visual Studio. I also post about Visual Studio Extensions that make your F# development experience better.
  4. F# is also a scripting language, so you can use REPL such as fsi (that comes with Visual Studio) or use web interface on tryfsharp.org or even using .NET fiddle which now supports F#. REPL makes it easier to try and test your code interactively.

However, learning and mastering a new programming language can be daunting task as you already have to keep up with new technology for your day-time job.

There are many F# books on the market, some can be good for overview and quick reference, academic, or written for developers who has C# background, or even for specific tasks.

Today, I will review the free F# e-book from Syncfusion, F# Succinctly by Robert Pickering. F# Succinctly has about 100 pages, so you should be able to finish it within a week easily. It starts with a good and concise introduction into functional and F# programming with a little bit of history. It also gives some idea about why F# is good for .NET developer and how it is different from other functional programming languages.

image

The book has been released for a while, so it’s based F# 2.0 and Visual Studio 2012. However, most samples in the books should still work besides FSharp Charting which you should follow the instructions how to set it up here instead

Like most F# programming books, the book introduces you to F# programming via REPL (fsi). It covers most of the F# programming basic that you should know include the followings:

  • Pattern matching
  • Type and Type inference
  • Records
  • Discriminated Unions
  • Function composition
  • Pipe operation (|>)
  • Partial function

In the later chapters, you will also learn about Object-Oriented aspect in F# and learn why multiple programming paradigm support makes F# suitable to solve different kinds of problems. At the end, you will learn how you can use F# to create user interfaces or graphics and creating real-world web and non-web application using F#.

image

However, as the e-book is written while F# 3.0 was still being implemented, the book doesn’t cover great F# 3.0 features like Type-Providers or LINQ support. Also, the book talks about important functional programming concept like recursion and pattern matching, but it doesn’t cover advance concept like tail-recursion, higher-order function, computation expressions, or active patterns.

In conclusion, the book is a good introduction to F# for anyone (especially .NET developers) who is interested in functional programming and F#. It should be an easy read and ignite your interest into learning F# and functional programming.

By the way, If you are interested in learning more about F#, there are many books, wikis, resources, news, and so on. Although, F# is originated in Microsoft, it’s open source edition and can run on other platforms like iOS, android. The best of all, F# has great and passionate people and community behind it. It also helps that I live in Nashville, TN which has three F# MVPs together with strong functional programming and .NET communities.

NOTE: Although I have been playing with F# for a while now, I still learn a lot of things from the book like how F# supports Unicode. Can you guess what Thai value names below mean in English? 🙂

let หนึ่ง = 1
let สอง = 2
let สาม = หนึ่ง + สอง

Create a super-duper-happy SPA web app using Durandal, Nancy, and Bootstrap

I start looking at Durandal after attending Jason Clark’s DurandalJS and Twitter Bootstrap at Nashville .NET User Group. Durandal is a SPA framework that incorporated several popular JavaScript libraries like JQuery, Knockout, and RequireJs. It’s also created by Rob Eisenberg who is also behind Caliburn.Micro.

For Nancy, I have heard about it in .NET Rocks and Hanselminutes podcasts for a while, but I haven’t had a chance to look at it until recently. Basically, Nancy (or NancyFX) is a lightweight web framework allowing you to build HTTP based web applications or services using .NET. Nancy is very easy to learn and set up.However, It doesn’t depend on System.Web and doesn’t need to be run on IIS at all. Most importantly, Nancy is very easy to learn and set up as you will see.

The last one is Bootstrap which is a very popular front-end framework that comes with HTML/CSS/JavaScript templates and controls. It allows us to create better-looking responsive web UI with small effort.

Using them together makes our job to create a web app much easier.


Ok. Enough with the background. Let’s get start by building a web app using Durandal and Nancy (I will touch on Bootstrap once we have a web app running).

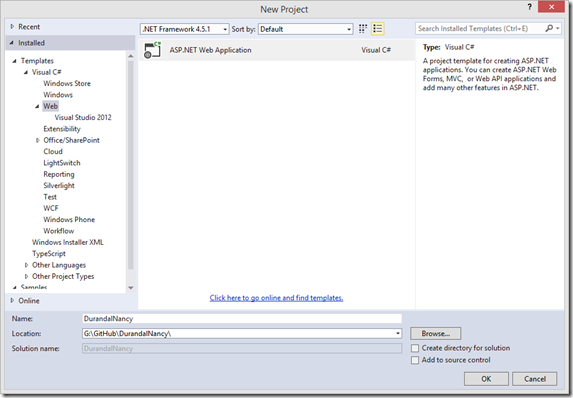
First, we start with just an empty ASP.NET web site.


001-Empty-Web-Project

002-Empty-Web-Project 


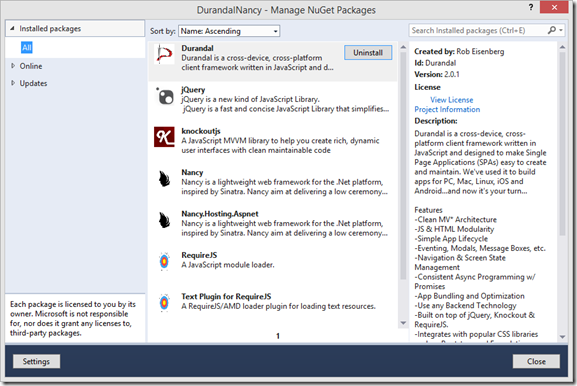
Once we have the web site project, we install Durandal and Nancy via NuGet. Since I want our web app to run on IIS, I also have another package, Nancy.Hosting.Aspnet installed.

image


If everything went smoothly, you should see these packages installed in your project. As Durandal is using JQuery, Knockout, and RequreJS, those packages will be installed as well.

004-NuGet-Packages


Now, let’s start coding. We start in the client-side by creating modules (viewmodels) and views. If you have played with the Durandal StarterKit, you should be familiar with the files (index.html, main.js, shell.js, etc.). I won’t explain what those files do here, but you can find more information about them here.

Next, we look at the server-side with Nancy. To set up a Nancy site, what I need to do is to create a C# class derived from NancyModule, and define route handler in the constructor. We don’t need to worry about the name. As long as it is derive from NancyModule, Nancy will find it. Here is how I want Nancy to return back index.html for the root URL.


using System;
using System.Collections.Generic;
using System.Linq;
using System.Web;
using Nancy;
namespace DurandalNancy
{
public class DurandalNancyModule : NancyModule
{
public DurandalNancyModule()
{
Get["/"] = p => View["index"];
}
}
}


By default, Nancy will look at static content like JavaScript files, css, images, and so on in /Content folder only. But we already have those static files that Durandal needs in App folder. So to make Durandal works, we need to tell Nancy to look at those folders as well by adding those folders to StaticContentsConventions which can be done in Nancy Bootstrap process. We can do that by creating a class derived from DefaultNancyBootstrapper and add some code.


using Nancy;
using Nancy.Conventions;
namespace DurandalNancy
{
public class DurandalNancyBootstrapper : DefaultNancyBootstrapper
{
protected override void ConfigureConventions(NancyConventions nancyConventions)
{
base.ConfigureConventions(nancyConventions);
nancyConventions.StaticContentsConventions
.Add(StaticContentConventionBuilder.AddDirectory("Scripts", "Scripts"));
nancyConventions.StaticContentsConventions
.Add(StaticContentConventionBuilder.AddDirectory("App", "App"));
nancyConventions.StaticContentsConventions
.Add(StaticContentConventionBuilder.AddDirectory("Assets", "Assets"));
}
}
}


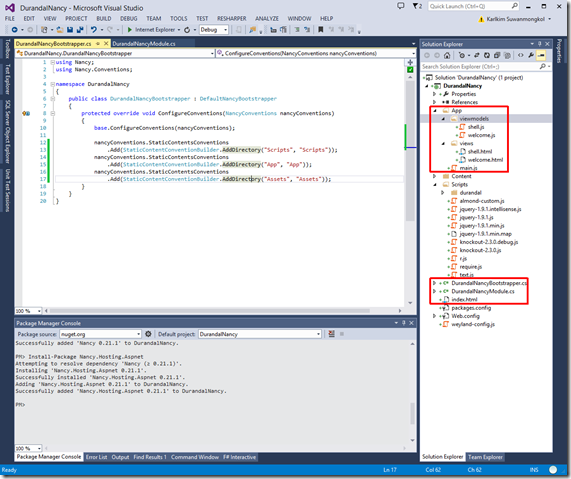
Here is how our project looks right now.

005-EDT-Minimum-Final


Now, let’s run the web app. And you should see our very simple web app

image 

To make our web app a bit less trivia, I will add another Durandal view and module which will do some AJAX call to get JSON data from the server. Here is the code in the new module.


define(['durandal/app'], function (app) {
return {
viewName: 'Thanks for visiting Durandal & Nancy Web App!',
description: 'Durandal is a SPA framework done right and Nancy provides a super-duper-happy-path to all interactions, so we have a super-duper-happy SPA web app done right!',
activate: function () {
$.getJSON("/api/list", function (data) {
app.showMessage(data.Message, data.Title, ['Agree']);
});
}
};
});
view raw goodbye.js hosted with ❤ by GitHub


The page is expecting the server to send JSON when it hits /api/list. With Nancy, we can do that easily by adding just couple lines of code.


using System;
using System.Collections.Generic;
using System.Linq;
using System.Web;
using Nancy;
namespace DurandalNancy
{
public class DurandalNancyModule : NancyModule
{
public DurandalNancyModule()
{
Get["/"] = p => View["index"];
Get["/api/list"] = p => Response.AsJson(new
{
Title = "Durandal & Nancy",
Message = "Super-Duper-Happy SPA Done Right!"
});
}
}
}


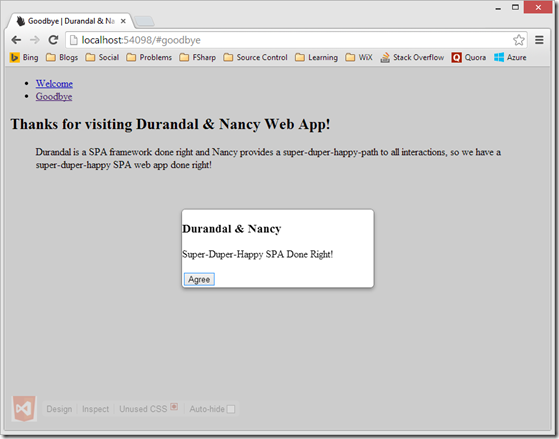
Now. let’s run our web app again and click the new link!

image

Wow! super easy, right?


So far, we just have our client-side and server-side code taken care. However, you probably notice that our web app doesn’t look good at all. This is how Bootstrap can help. By using its reusable CSS templates, we can make our web app looks much better with ease.

Before we can do that we have to install Bootstrap package.

image


Next, we bootstrapify our pages by adding Bootstrap CSS class to HTML elements in our Durandal views. Besides reusable JavaScript/CSS components, there are many things that Bootstrap can help, most notably, the grid layout system.

image


Let’s run our web app again.

image


That’s it. Using Durandal, Nancy, and Bootstrap, we have a super-duper-happy SPA web app done right! 🙂


For the full source code, please see my github repo. I have each step in git branches as well. If you want to see the site in action, I also set up the Windows Azure web site here,

Happy coding!

Add Code Syntax Highlighting to your Ghost blogging site

If you have followed my posts about setting up Ghost blogging site on Windows Azure and adding Disqus comment and changing your Ghost site theme, you probably notice that code block that comes with Ghost is very plain and has no syntax highlighting.

019-Code-Block

Don’t worry, you can easily add syntax highlighting to your ghost site. There are many ways to do that, but in this post, I will use google-code-prettify.

In this sample, I use the default casper theme, so what I need to do is to add

<script src="https://google-code-prettify.googlecode.com/svn/loader/run_prettify.js"></script>

to content/themes/casper/default.hbs (NOTE: put where the main script tags are. Other themes might require you to put the script tag above in different line). As usual, I will just use Visual Studio Online to update the code.

image

However, instead of using 4 spaces of indentation to create a code block, you will need to put something that is similar to GitHub Flavored Markdown. Here are samples for C# and F# code respectively (NOTE: Highlighting also works with other popular languages like JavaScript, XML, C++, and so on).

image

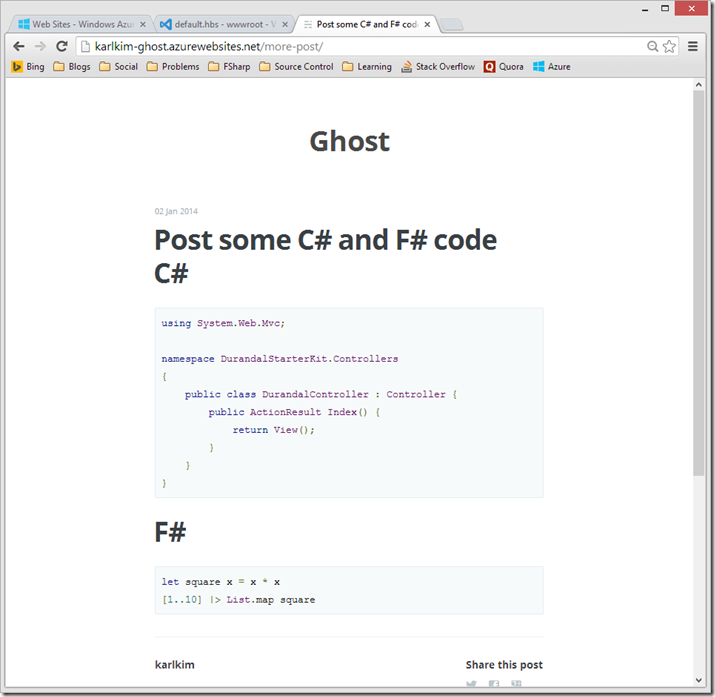
And here is out post with nice code syntax highlighting for both C# and F# code.

image

Happy Blogging!